A year long journey to fix a hard drive
I fried my NAS hard drives, here's how I was able to recover my data.
Disclaimer
Hard drive recovery is no joke, and if there’s serious stuff on the line I would leave it to the professionals. I assume no responsibility if you end up permanently destroying your data after trying the methods I used here.
TL;DR
- I was very lucky.
- Back up your data and check that your backups are working.
- A RAID 1 configuration does not count as two “backups”.
- Schedule and perform regular manual backups if necessary.
- Double check every power adapter before plugging it in.
How I killed my hard drives
When I was moving, I had to clear all of the stuff from my desk area. This included the computer, monitors, all of the accessories and their power bricks. To drive my fancy headphones, I have an amplifier, and to store my files, I have a NAS (Network Attached Storage). I was using a QNAP 2-bay unit which was configured in a RAID 1 mirror.
I was very careful when moving. Anything with a spinning HDD was fully powered off, and I was very careful to move it first before most other things. I distinctly remember buckling up both my desktop computer and the NAS in the car seats. Towels were put over the monitors to prevent them from scratching. My entire rat’s nest of cables was thrown into a huge bag.
The move went just fine. Once the Internet access was setup, I began to set up the desk again (but cleaner this time). I plugged in everything and let it be, as I had other things to do.
A few weeks later, I was planning to set up a Plex server to run off of the NAS.
April 28 2019 11:00 PM
ChrisJ: so my NAS had a static IP set
ChrisJ: and you can reset it so that it just uses DHCP
ChrisJ: buut I think I made it do a factory reset
ChrisJ: and now it wants to wipe my hard drive before I can use it
ChrisJ: luckily there's two that are mirrored
At first, I just thought that because of that IP addessing issue (I had changed my subnet range), that I would have to pull the drives out, let the NAS reset, and reload all of my data. A pain, but no big deal.
April 29 2019 11:00 AM
ChrisJ: well ****
ChrisJ: neither of these drives are spinning anymore
ChrisJ: oh huh, the drives are in warranty
ChrisJ: but I have to call their support line 🙃
ChrisJ: **** my backup is super old
ChrisJ: turns out I had a lot of data that was only stored on that NAS
So, my only backup (which was a USB 4TB drive) was super old. In the time between the last time I backed up and then, I had migrated all of my raw camera photos to the NAS. And only the NAS.
April 30 2019 11:30 PM
ChrisJ: wow. I think I just figured out why my hard drives died, turns out that I grabbed the wrong power supply from the giant bag of similar-looking power supplies I had
ChrisJ: so the NAS seemed to work just fine, but that would explain why the drives died
ChrisJ: 24V
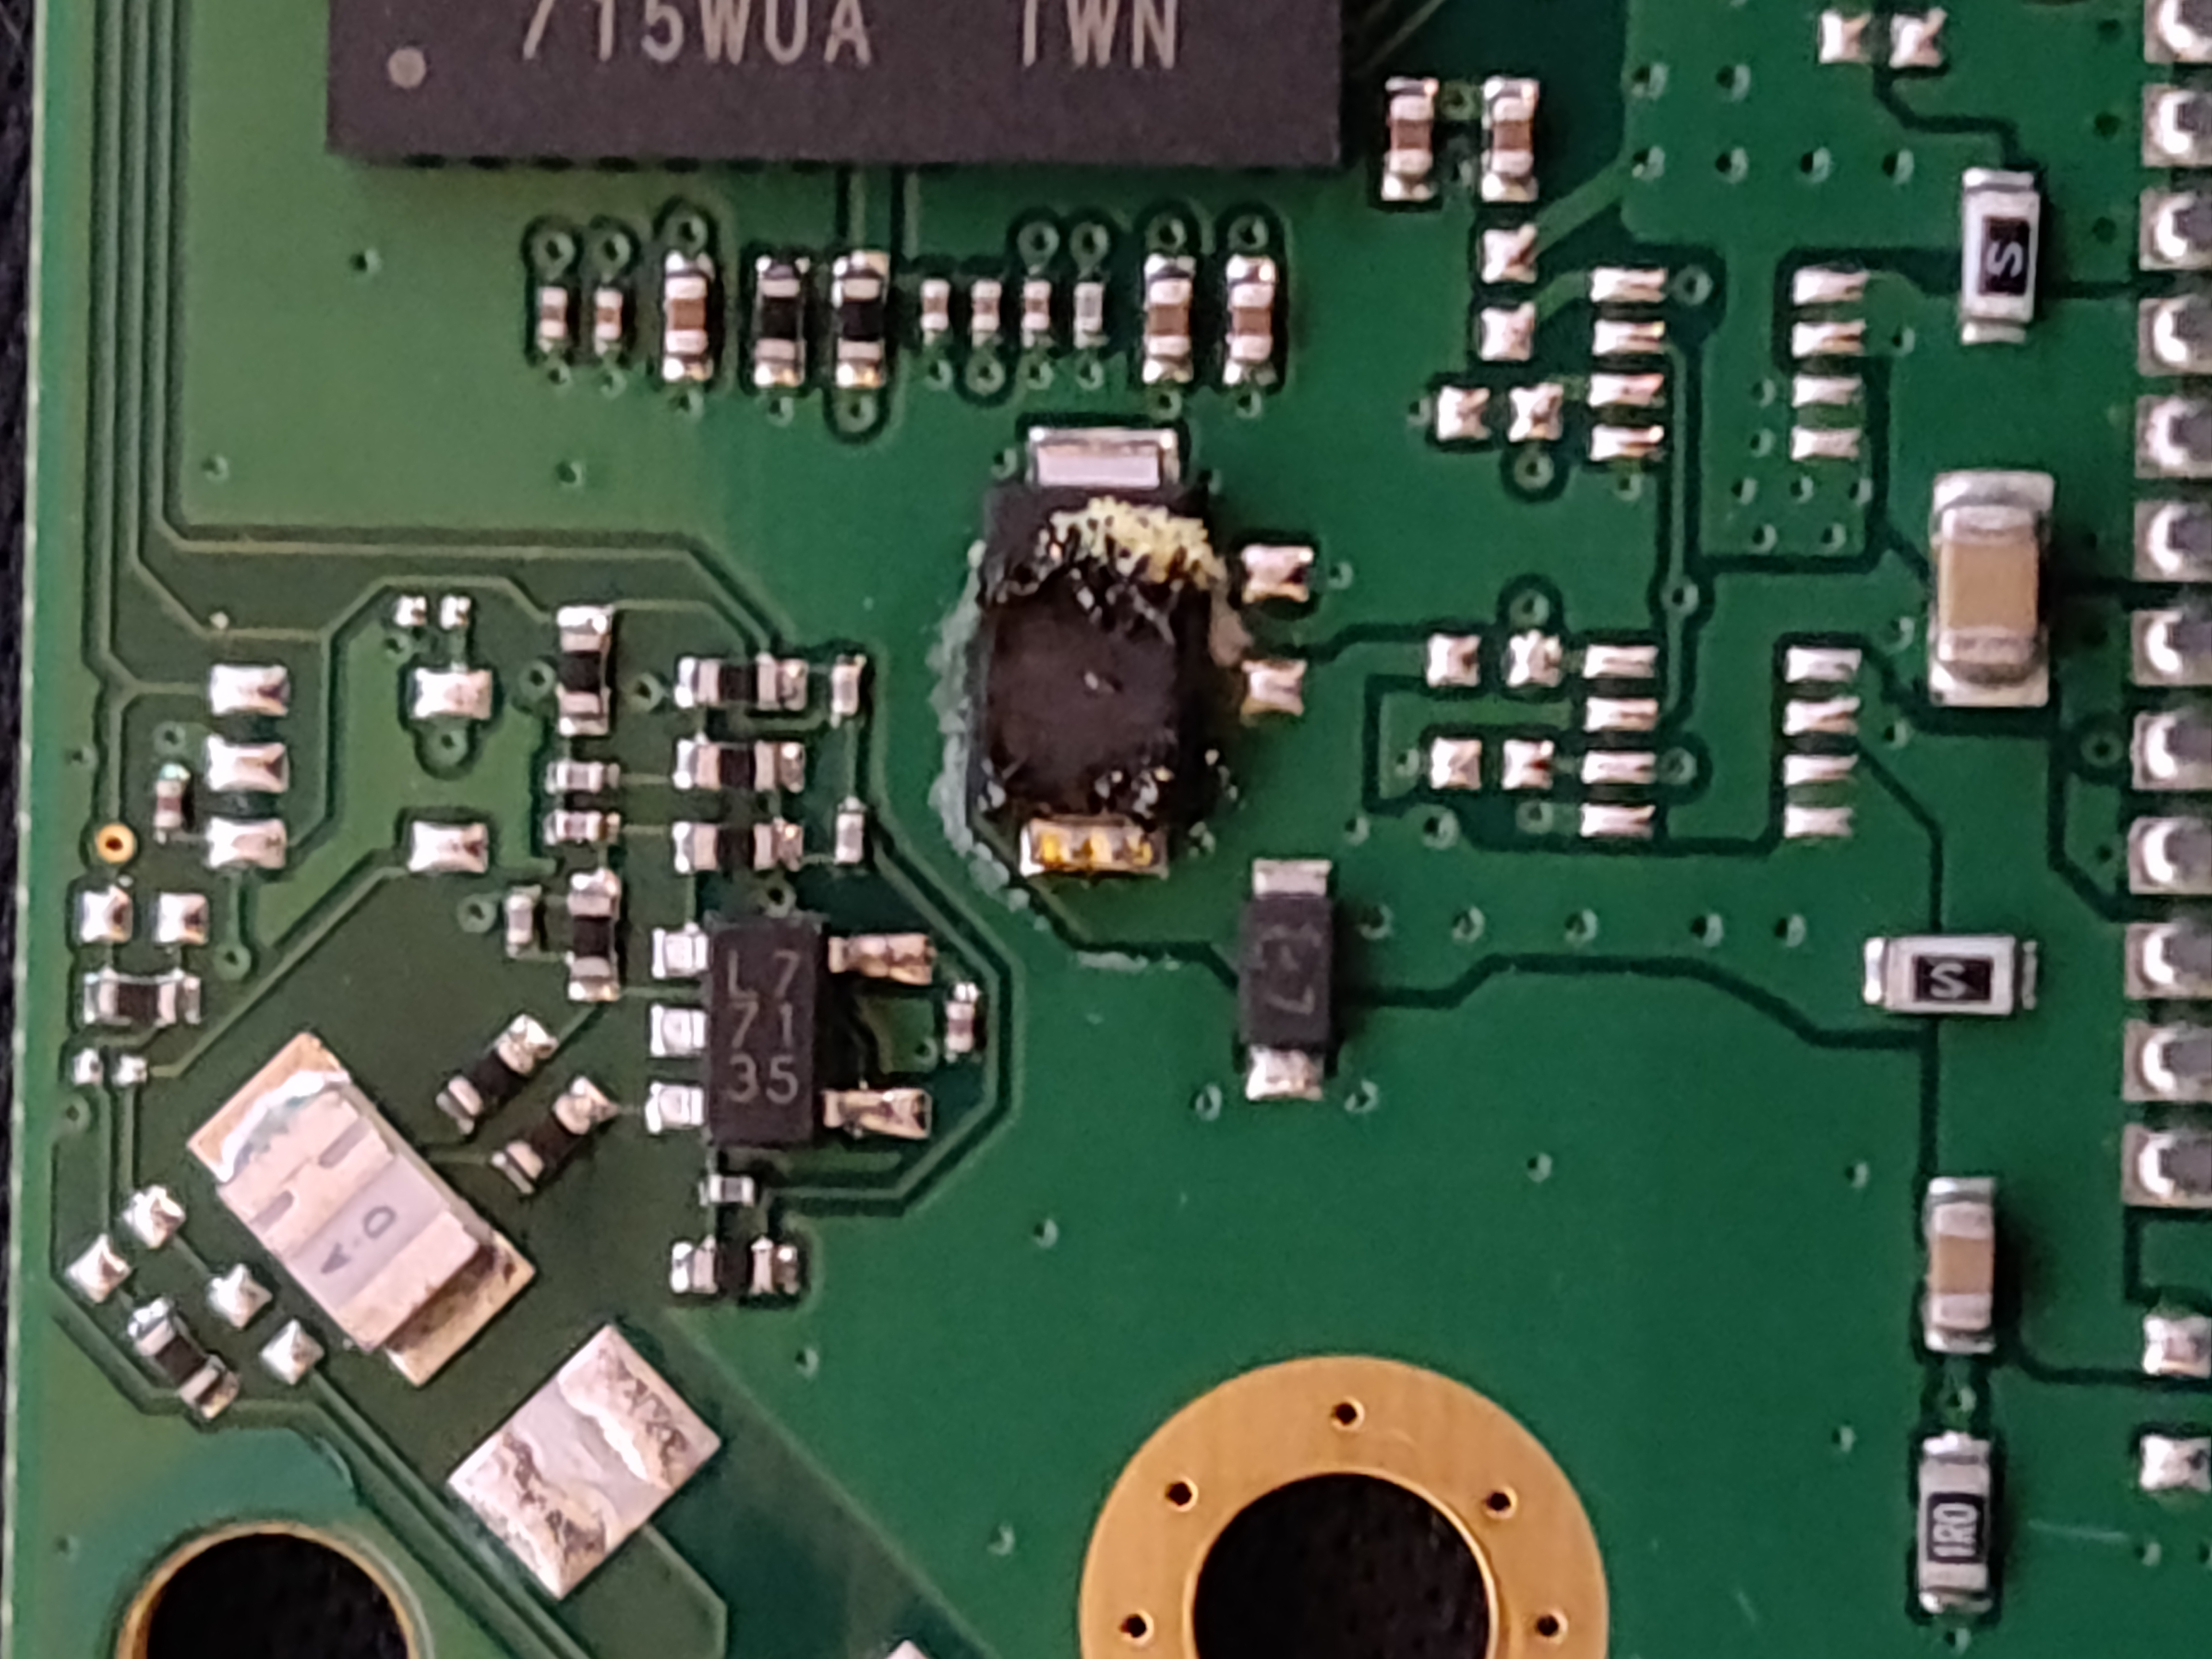
ChrisJ: so looking at the controller
ChrisJ: there's a diode that looks a bit crispy
(This was a chat with other people, but I’ve just grabbed the snippets that I said which form my timeline of events.)
ChrisJ: this wouldn't have been a problem if I didn't move lol
ChrisJ: and if my headphone amp and NAS didn't use the same barrel connector
A summarized timeline of events:
- I moved and got settled after a few weeks.
- My NAS wasn’t working.
- I thought that my NAS would require a factory reset, wiping all of the data.
- I pulled the drives out to grab the data off, and found that they wouldn’t spin when plugged in.
- I discovered that my backups were months old and didn’t contain important data.
- Western Digital’s warranty would replace but not recover the drives.
- I discovered that I used the wrong power brick with the same barrel connector but double the voltage, and that
one of the diodes on the board was now very crispy.
- And given this, I doubt WD would replace those drives for free.
- I was quoted $600-$1000 for data recovery of the drives over the phone.
- Seemingly, I noticed that the moment you mention “RAID”, despite this being a mirror, the prices go way up.
Why didn’t I notice sooner?
So, I used a power adapter with the same barrel connector but twice the voltage. Why didn’t I notice this sooner?
Of course, I should have checked the power brick more carefully. It was in a bag with many others, and I had assumed that if the connector fit, then it was fine.
But still, why didn’t I notice that immediately after plugging it in? Where was the magic smoke? Why did the NAS still work with double the voltage, but my drives didn’t?
This is speculation, but I’m guessing that the NAS’ compute hardware is all regulated at a voltage that isn’t 12V. This voltage regulator must have a pretty wide range of inputs that it could handle, since the computer part of the NAS was fine. (In retrospect, it also seems that the 5V logic of the hard drive controller was fine too.)
As for the stuff that needs 12V, the hard drives and the NAS case fans, clearly that wasn’t being regulated. Maybe it drew too much current for a small regulator, and so they assumed that the power from the brick would be fine enough. Once I noticed this error, I did observe that the fans were spinning faster and louder than before.
This I found to be frustrating. I would have preferred that my NAS were zapped first, before my drives. Who cares if the NAS compute dies, the storage is much more important!
So, now what?
I was stuck with two dead hard drives that had been zapped with double the voltage for several weeks.
Here were the options that I considered:
-
I could pay $600-$1000 (or more, or less) to have the drives professionally recovered.
I think this option makes a lot of sense if I had business-critical data with a large monetary value. But these are only personl files. I wouldn’t value them all at $1000, but I still wanted to have the original copies of photos that were saved there.
I also was a few months away from starting my job, so I didn’t have a source of income at the time.
-
I could replace the drives with new ones.
No.
-
I could try to fix it myself.
I have had no prior experience with hard drive repair or data recovery. I found a few approaches suggested online, which include removing some components that do power regulation, or swapping the controller BIOS chip.
In addition, most professional places will ask that you do not attempt your own recovery, and will charge you more if they can tell that you have. (This makes total sense.)
The silver lining to this situation was that I didn’t have to make a choice immediately. These non-functional drives could act as paperweights on my desk for as long as I want. (Though, supply of identical donor parts is a ticking clock.)
What I tried
I really didn’t want to fork out the cost of data recovery.
I panicked a bit for the first few days, and so I had decided to try some recommendations that I had seen online.
The most common solution that I saw for this situation is to remove the “TVS” diode. This is the same diode that was all crispy on the image shown above. This recommendation involves either desoldering or destroying this diode if it shows as shorted with a multimeter. When the input voltage exceeds some amount, this diode shorts the input voltage to ground, which saves the other circuitry on that voltage line.
There was one important detail that these suggestions usually didn’t recommend, which is to also check the 0 ohm resistors before these diodes. These resistors act as hardware fuses. If there’s a problem and too much current flows through, the resistor will break the circuit and be open.
So, the combination of the TVS diode and 0 ohm resistor act as voltage regulation, and are easy things to try first.
I did not check the 0 ohm resistor (at first), so this didn’t get me anywhere with either drive.
Loss Mitigation
So after trying the low-hanging fruit, I had realized that professional drive recovery would be the way to go.
But it was so expensive.
And so, I let these drives sit on my desk and collect dust for a while.
While I let the drives sit around, I figured that I should try other ways to mitigate this data loss. Maybe I did have a copy of these files somewhere that I didn’t know about?
Disposable data
A large amount of the files on my NAS were no big loss. Downloaded media, files, etc. that I could re-download all over again.
A lot of smaller important files were already synced very well. I use Nextcloud to sync stuff between a few machines, the server, and my phone.
Getting (some) of my photos back
I like photography, and so for some of my better photos I’ll have them printed. This was the first place I looked for off-site backups.
The big problem is that RAW photos use up a lot of space, so these were not as well synced.
Amazon Cloud
I used to use Amazon Cloud Storage, since I was already paying for Prime and it had a ton of storage. However, I stopped using it regularly because:
- the sync app handled merges poorly
- Amazon runs facial recognition on your photo library (creepy)
- no Linux client
Because of the image processing, I decided to remove most of my data from it. However, I still will sometimes print some photos because it’s cheap and quick.
Amazon will let you re-download the photos that you upload (assumed to be in the original quality?), but since I only had a small handful of the best photos uploaded, this only yielded a small fraction of results.
Costco Photo
Costco also does photo printing, and is my go-to usually. It’s a similar story, I only had the photos that I wanted printed uploaded to the site, not everything, and certainly not the RAW photos.
One important difference is that Costco does not let you (or does not make it easy) to re-download the photos as they are uploaded in the original quality.
You can download the thumbnails, but they are slightly compressed. I wrote a TamperMonkey script to do this.
The alternative that Costco offers is a Photo USB, which is just a flash drive with your files. I found that these files seemed like they were of the original quality, but they still aren’t the Camera RAWs that I really wanted. I paid $10 for the flash drive anyways.
Trying it again
After a year of trying to scrape together my missing files, I realized that I wasn’t too happy with the results.
I wanted to try it again.
Replacing the TVS diode?
I didn’t fully understand the purpose of the TVS diode, and so I figured, why not get a new one and replace the one that went bad?
This did not work. Still dead.
Attempting a BIOS Swap
The other common approach that I’ve seen recommended is to perform a BIOS swap of the controller boards.
Modern hard drives are calibrated for the physical hardware that needs to spin and move around. You cannot just swap a controller board from a working hard drive onto a non-working hard drive without modification, because without this calibration, bad things could happen.
You can swap the BIOS chip of one controller board to another. And it should just work?
I found some (sketchy looking but apparently reputable) sites that will happily sell you matching donor boards for hard drives, and give you everything you need to do it. Given that I knew I had a power issue, I decided to give this a go.
My concern was that these drives were overvolted for a while, not an instant but weeks straight. If the BIOS chip were impacted, then it’s back to a paperweight.
I tried it with one of my drives. No dice. In hindsight, I think that I may have screwed up when de-soldering the donor board’s BIOS chip, and screwed up a pad on the PCB.
When I plugged in the franken-drive*, it didn’t spin. Because my drives were in a RAID 1, I decided to try again with the other drive.
* Dr. Frankendrive’s monster doesn’t have the same ring to it.
On this second drive, I again screwed up the desoldering process, and burnt off a pad on the donor PCB. (This turned out to be a good thing.) There goes another $50.
Luckily, I could repeat this process with another PCB, since I hadn’t touched the dead PCB.
One last thing…
It’s a good thing that I started with the donor PCB first.
Frustrated with those previous results, and after seeing a video in my YouTube feed about performing a TVS diode fix, I decided that I should check this one more time with the dead board.
Of course, I’ve put in the new diodes by now, so those were fine. But one aspect that I had not realized was that I wasn’t checking the right 0 ohm resistors.
And it turns out, I should have done that a long time ago. There were a few on this PCB, and two that I didn’t recognize as 0 ohm resistors, because they were marked with a “T” in the silkscreen. When I checked both (one for 5v and one for 12v), one read nearly 0 ohms and the other was an open circuit.
Please work, please work, please work, please work…
Because this resistor was open, the 12V circuit wasn’t getting any power. I bridged a blob of solder over this component. (Effectively the same as putting a nail in a fusebox.)
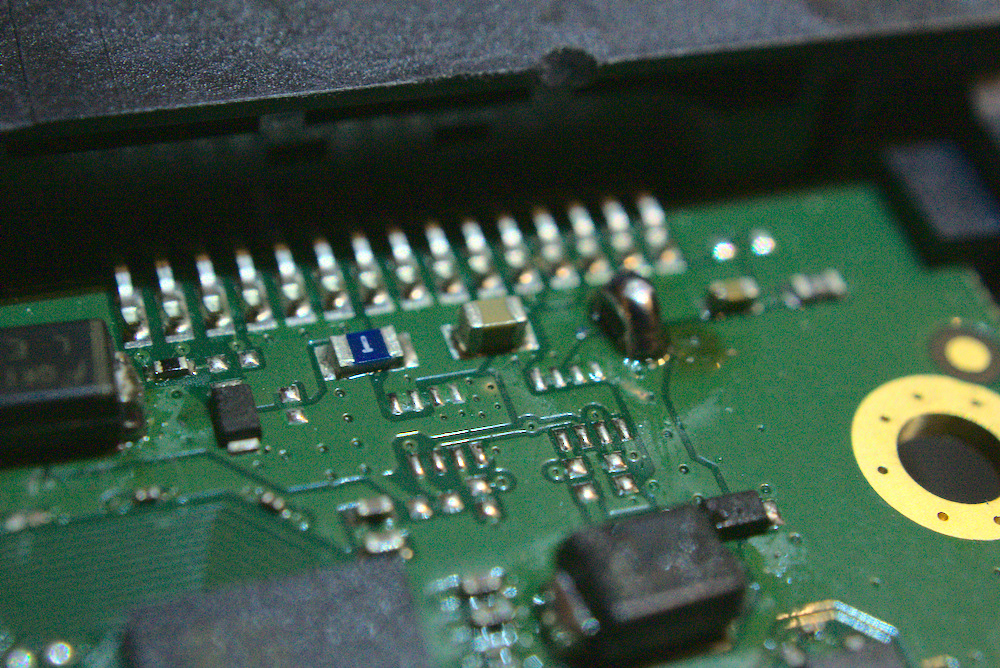
In this image, the blue component with the letter “T” is the 0 ohm resistor for the 5V line. The blob of solder is bridging the 12V one.
Once I powered on the drive… it started to spin! SUCCESS!
After a whole year of trying, this drive is alive again. Luckily it was a RAID1, so that other drive doesn’t really matter in this case.
Backing up these files as fast as I can
Wow, my drive is back! Now, how can I get those precious bits off of this spinning rust before the drive breaks? I don’t anticipate it breaking, but I’ve also removed any sort of voltage protection from the drive. It’s not safe to use anymore.
At first, I tried plugging the drive into Windows. As soon as it mounted the disk, it asked me to format all 5 of the partitions. Nope, clearly that won’t do!
Then, I tried CloneZilla. I wanted to create a full image of the disk, with all of the partitions, so that I could recover everything intact. This didn’t work out, because it turned out that my USB hard drive was just slightly smaller than the image size, and so it ran out of space. I found this out after running it for over 24 hours straight. Waiting that long was agony.
And finally, I just tried mounting the drive on Linux. For some driver related reason, my laptop on Ubuntu 18.04 was not cooperating, and so I had to stick to my desktop.
Using both mdadm and the LVM2 cli tools (vgchange), I was able to mount the RAID1 partition and the LVM 2 partition contained within it.
Using just a USB drive enclosure is slow, it took about 20 hours to copy all of the files off. But I could finally unearth the files that I had lost for a whole year!
The Takeaways
This was still an expensive lesson, but could have gone much worse. And so I have some actionable takeaways that I encourage for anyone reading this.
I was very lucky
I was very lucky do have performed these actions in this specific order, and to have a drive that still works at the end. I saved a bit of change, but if there were anything of serious value on those drives, I should have just left it for the professionals.
(I mean, pictures of dogs are very valuable.)
Double check and label wall warts and power bricks
Always double check the power properties of power bricks, even if they fit with the same connector.
This caused all of my issues, because an identical connector to another had twice the voltage. This was a very dumb mistake.
As a bonus, I’ve picked up a labelmaker which has been super useful for this. As soon as I buy a new device with a power brick, I label what it’s for exactly, to prevent this from happening again.
Backups, backups, backups
3 copies of your data. 2 copies on different storage media. 1 copy located offsite.
If my backup were up to date, I wouldn’t have had to deal with these broken drives.
A RAID 1 does handle a single drive mechanical failure, but does nothing if both drives fail at the same time.
What I’m doing about this
As I write this, I’m actually still copying data off.
The action that I’ve taken from this includes methods I’ve mentioned before, including labelling my power adapters and being very careful about matching them to devices.
In addition, I now have two USB 4TB backup drives, which I keep in sync manually every month, or whenever I add some new data to the NAS.
To satisfy the offsite rule, I’ve been backing up my data to Azure Blob Storage using rclone, which is a CLI tool that can copy data to and from all sorts of places. (Encrypted too!) The Archival tier is cheap enough.
It’s also important to audit these methods as well. Can I actually retrieve this data without relying on something else?
Wrapping up
I have my pictures back! Here’s a picture of a muddy dog that was stuck on those drives:

This experience sucked. I’m happy to get my data back, but having my photos stuck in limbo for a year and a half was miserable.
I rate “nuking your hard drives” a 0/10.